1. The first step is to have something to 3D print. This is usually something created using CAD software.
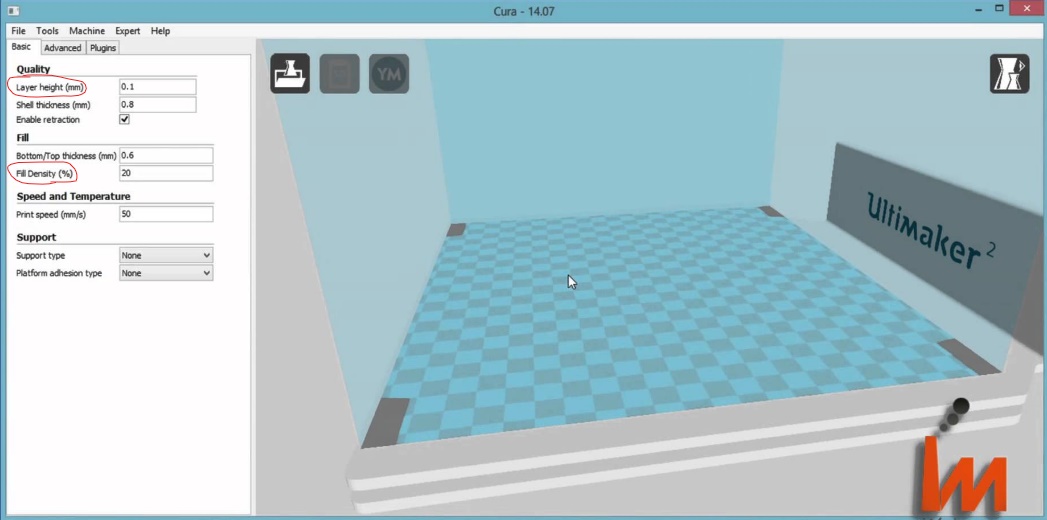
2. The next step is to import the design to a 3D printing program. For this, I used Cura. Here is an example of the Cura interface from the internet--I did not make this design.
 |
| Cura 14.07 |
- Layer Height (mm): 3D Printers create 3D objects by adding one small layer on at a time. If you have taken Calculus AB, a good analogy is the step size of a line created with Euler's method. The smaller the step size, the closer the estimate will be to the real function. In 3D printing, a smaller layer height produces smoother, more natural surfaces, like a playground slide compared to a flight of stairs. The drawback of this increased quality is increased print time, because the nozzle must go over the same surface more times.
- Fill Density (%): This is probably the most important feature, because it determines the 3D print's durability and how much plastic it uses. For example, objects that will be under high stress need a higher fill density for added strength. To make a hollow object, set the fill density to 0%. For a solid object, set it to 100%. Anything in between these extremes will fill a percentage of the volume within the 3D print in a uniform lattice structure.
3. Then, once the variables are set to the desired values, it is time to print! This is the 3D printer I will be using.
 |
| Note the blue "string" sticking out of the print head. |
The blue lever on the side of the print head disengages the rollers that keep the filament in place.
The bed on the bottom moves left, right, up and down to position the nozzle.
The white piece at the top holds a spool of filament, allowing the user to choose the color and quality of the filament.
I need to remove the leftover filament shown in the previous picture. Right now the nozzle is at room temperature, so the filament is stuck inside. I need to heat the nozzle to 208 degrees Fahrenheit, the filament's melting point. To do this, I use Cura's printing interface, which is, unsurprisingly, very different from a normal printer's.
 |
| Only a few of these controls are necessary to set up and operate the printer. |
Now I can put my filament into the print head.
 |
| My algae-based, smelly filament |
 |
| Fed into print head opening |
Hi Alek, this is a great explanation of the way 3D printing works. I am very excited to see your final product! I was wondering, what is the material used for printing? Are there materials beyond different plastics that can be used?
ReplyDeleteHey Shambhavi, plastic filament is the primary material used in 3D printing, because it is relatively cheap, light and strong. You can also 3D print with a wide variety of metals, porcelain, acrylate, sandstone, and even wax!
ReplyDeleteThank you for the detailed description of a 3D printer. I have never used one and you explanation helped me understand. If you were to make a large hollow cube, what would stop the top side from sinking in?
ReplyDeleteHi Mr. Weber,
DeleteGood question!
When making a cube, the 3D printer will create an exterior "frame" along the edges and then fill in the sides. To fill in a side, it will travel around the square frame continuously, applying layer after layer. By the time the nozzle travels around once, the previous layer will have cooled.
The 3D printers have one or more fans pointed directly at the nozzle. This makes the filament cool very quickly when applied to the 3D print. Even without the fans, melted filament cools in a matter of seconds.
I think that individual layers are also too thin to "sag" significantly during printing. Layer thickness is easily less than 1mm.